A spare room can become a useful walk-in wardrobe without a full renovation. The key is planning around the clothes, shoes, and daily routines you actually have. How to convert a spare room into a wardrobe starts with careful measuring: note the wall lengths, ceiling height, door swing, and window position before buying storage. A tape measure and a simple room sketch can prevent costly mistakes.
Houzz’s 2024 U.S. Houzz & Home Study reported a median renovation spend of $24,000 in 2023. That figure covers many kinds of projects, not wardrobe conversions, but it shows why a clear budget matters. Set aside funds for lighting, paint, rails, drawers, and fitting work. Keep a little spare. Older floors and uneven walls can complicate installation.
Organizing consultant Marie Kondo wrote, “The question of what you want to own is actually the question of how you want to live your life.” Her advice offers a useful starting point: edit your belongings before designing storage. Hang frequently worn pieces at easy reach, place seasonal items higher, and leave space to move comfortably. Add a mirror and soft, even lighting. Check ventilation, too; a packed room can feel stuffy. Small details count. This guide explains how to assess the room, choose practical storage, and avoid common layout mistakes. Some choices may still need adjustment once the room is in use. That is normal.
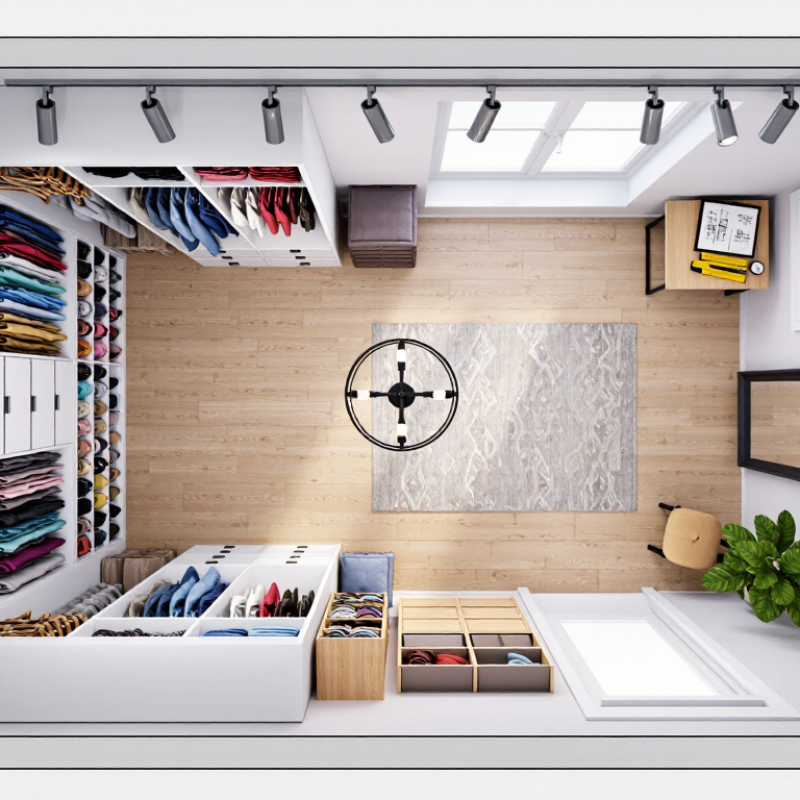
Converting a spare room into a walk-in wardrobe starts with accurate measurements. Begin with a tape measure, not a furniture catalogue. Record each wall’s length, ceiling height, door swing, window position, and radiator location. Leave at least 90 centimetres for comfortable movement between storage units. A narrow walkway may look acceptable on paper but feel awkward when carrying laundry. Mark the proposed cabinets with masking tape on the floor. This gives a more realistic sense of scale.
Room condition matters. Check for damp patches, peeling paint, poor ventilation, and uneven flooring before installing storage. Moisture can damage clothing and weaken wooden fittings over time. Inspect the electrical points and lighting. A qualified electrician should handle any new wiring or ceiling fixtures. Natural light helps with colour matching, but direct sunlight may fade delicate fabrics. My first plan ignored the low window and blocked part of it. That mistake reduced light and made the room feel smaller.
Storage should reflect real habits, not an idealised wardrobe. Count hanging clothes, folded items, shoes, bags, and seasonal pieces. Long garments need taller sections, while knitwear needs wide, stable shelves. Drawers can protect smaller items from dust and visual clutter. Include a full-length mirror only after confirming it will not obstruct the door. I once planned too many shelves and too little hanging space. The design looked tidy, yet it failed my daily routine. Review what you actually wear. Empty space is useful, but wasted space is expensive.
Converting a spare room into a walk-in wardrobe starts with a measured layout, not attractive fittings. Record the room’s length, width, ceiling height, doors, windows, and electrical points. Leave about 90 centimetres for comfortable movement between storage runs. A narrower aisle may work, but it can feel frustrating when drawers open.
The 2024 National Association of Home Builders report found that 79% of buyers wanted a laundry room, while 55% wanted a walk-in pantry. These figures show how strongly buyers value organised household storage. Divide the wardrobe into practical zones: double hanging for shirts and trousers, tall hanging for coats, drawers for folded clothing, and open shelves for bags. Place frequently used items between waist and eye level. Add adjustable components. Needs change.
My first layout would have included too many shelves. That looked efficient on paper, but reduced usable hanging space. A better approach is to reserve one wall for long garments and another for everyday clothing. Use a full-length mirror near the entrance, with a small seat below it. The U.S. Department of Energy reports that LED lighting uses at least 75% less energy than incandescent lighting and lasts much longer. Install even ceiling lighting, then add sensor-controlled illumination inside darker sections. Keep ventilation clear, especially where clothing touches external walls. Some corners may remain imperfect, and that is acceptable if the room stays easy to use.
| Planning Area | Recommended Dimension or Quantity | Suitable Storage Components | Practical Capacity | Key Planning Considerations |
|---|---|---|---|---|
| Room Planning and Layout | ||||
| Minimum single-sided layout | About 1.5 m room width | One run of wardrobes with a central passage | Suitable for one main clothing wall | Allow approximately 600 mm for wardrobe depth and at least 900 mm for comfortable movement. |
| Comfortable double-sided layout | About 2.1–2.4 m room width | Wardrobes on opposite walls with a central aisle | Provides storage for clothing, shoes, accessories, and folded items | Use approximately 600 mm-deep storage on each side and preserve a central passage of about 900–1,200 mm. |
| Island layout | Generally requires at least 3.0 m room width | Perimeter wardrobes plus a central island | High storage capacity with a dedicated folding surface | Leave roughly 900 mm or more around the island so drawers and doors can open without blocking circulation. |
| Door clearance | Keep the entry zone unobstructed | Sliding door, outward-opening door, or inward-opening door with clear landing space | Improves access to the first storage section | Check the door swing, skirting boards, light switches, and radiator positions before fixing cabinetry. |
| Ceiling height use | Use the full height where practical | Standard hanging zones plus high-level cupboards or boxes | Adds seasonal and luggage storage | Place infrequently used items in high cupboards and retain safe access with a suitable step stool. |
| Core Storage Components | ||||
| Short-hanging section | Approximately 900–1,000 mm high | Hanging rail for shirts, blouses, jackets, skirts, and folded trousers | Efficient daily-use hanging storage | Use two short-hanging levels where the user prefers compact garments and frequent access. |
| Long-hanging section | Approximately 1,500–1,700 mm high | Full-height hanging rail for dresses, coats, and long garments | Prevents garments from dragging on the floor | Measure the longest garments first and allow extra clearance below the rail. |
| Folded-clothing storage | Shelves spaced about 250–350 mm apart | Adjustable shelves, open cubbies, or pull-out baskets | Suitable for knitwear, jeans, sportswear, and casual clothing | Adjustable shelves provide better flexibility than fixed shelves when storage needs change. |
| Drawer section | Drawer heights of approximately 100–200 mm | Soft-close drawers with full-extension runners | Organizes underwear, socks, jewelry, belts, and smaller accessories | Use shallow drawers for small items and deeper drawers for bulky folded garments. |
| Shoe storage | Shelves spaced about 180–220 mm apart | Angled shelves, pull-out shoe racks, or ventilated cubbies | Stores everyday footwear in visible pairs | Allow additional height for boots and keep shoes away from delicate clothing where possible. |
| Accessory storage | Use narrow vertical or drawer modules | Pull-out trays, hooks, peg panels, scarf rails, and divided inserts | Keeps belts, scarves, handbags, and jewelry easy to locate | Position frequently used accessories between waist and eye level for convenient access. |
| Laundry and valet zone | Reserve a compact dedicated area | Pull-out laundry basket, valet hook, and mirror | Supports dressing and sorting routines | Place the laundry basket near the exit and install a temporary hanging hook for outfit planning. |
| Functional Specifications | ||||
| Wardrobe depth | Approximately 550–600 mm for standard hanging | Full-depth hanging units, shelves, and drawers | Allows most garments to hang without excessive compression | Shallower units may work for folded storage, but check hanger and door clearances carefully. |
| Open shelving depth | Approximately 300–400 mm | Adjustable shelves and display cubbies | Suitable for folded clothing, bags, and storage boxes | Avoid excessive depth because items at the back may become difficult to see and reach. |
| Central circulation space | At least 900 mm; 1,000–1,200 mm is more comfortable | Clear walkway between storage runs | Allows dressing, browsing, and drawer access | Measure the clear finished space after doors, handles, skirting, and drawer fronts are included. |
| Lighting | Layered ambient, task, and interior lighting | Ceiling light, vertical lighting, and sensor-activated cabinet lights | Improves garment visibility and color recognition | Use even, low-glare illumination and avoid placing strong light directly behind the user. |
| Ventilation | Maintain regular air movement | Existing window, air vent, or mechanical ventilation | Helps reduce odors and moisture accumulation | Do not block vents or press storage tightly against damp external walls without appropriate protection. |
| Mirror placement | Full-length mirror positioned near the exit or fitting area | Wall-mounted, door-mounted, or freestanding mirror | Supports outfit checking without reducing wardrobe capacity | Keep the mirror in a well-lit location with sufficient standing distance for a full view. |
| Storage Allocation Example for a Spare Room | ||||
| Hanging storage | About 40–50% of total wardrobe width | Combination of short- and long-hanging rails | Prioritizes garments that crease easily | Divide the hanging space according to the actual clothing collection rather than using equal sections. |
| Folded storage | About 25–35% of total wardrobe width | Adjustable shelves, drawers, and baskets | Handles knitwear, denim, activewear, and everyday basics | Keep frequently worn folded items between knee and shoulder height. |
| Shoe and accessory storage | About 15–25% of total wardrobe width | Shoe shelves, pull-out trays, hooks, and divided drawers | Uses narrow spaces efficiently | Group items by frequency of use and keep seasonal accessories in higher or less accessible zones. |
| Flexible reserve space | Keep approximately 10% unassigned | Empty shelves, adjustable rails, or movable baskets | Accommodates future wardrobe changes | Reserve capacity prevents the room from becoming overcrowded as clothing and accessories increase. |
Dimensions are practical planning guidelines for residential walk-in wardrobes. Confirm final measurements on site, including wall irregularities, finished flooring, skirting boards, door openings, electrical points, heating equipment, and ventilation routes.
Before adding rails or drawers, inspect the spare room as if it were a building project. Measure natural light at different times, then plan layered lighting for mornings, evenings, and cloudy days. A ceiling fixture provides general brightness, while adjustable wall lights reduce shadows near mirrors. Keep switches reachable from the doorway. For electrical changes, use a qualified electrician and ask for the work to be checked properly.
Flooring needs to tolerate frequent walking and rolling storage units. Repair loose boards, squeaks, and uneven areas before covering them. A level subfloor protects furniture from rocking and prevents awkward gaps beneath cabinets. Hard flooring is easy to clean, but it can feel cold underfoot. I once chose appearance over comfort and regretted it during winter. A washable runner would have helped.
Wall repairs often reveal more than expected. Fill nail holes, seal stains, and check corners for dampness before painting. Do not cover a musty patch with fresh paint. Find the moisture source first. Smooth walls make fitted storage look intentional, especially around bright lighting. Use a small lamp during preparation; it exposes ridges that daylight can hide. I still missed one uneven patch behind a tall unit, which reminded me to inspect from several angles. Let repaired surfaces dry fully before installation. A rushed wall can crack later.
Converting a spare room into a walk-in wardrobe starts with accurate measurements. Mark doors, windows, sockets, and heating vents before installing anything. Leave enough space for comfortable movement, usually around 90 centimetres between storage runs. I once planned a tighter layout, and opening drawers became awkward. That mistake changed my approach.
Install wardrobe rails at heights that match your clothing. A double-rail arrangement works well for shirts, skirts, and folded trousers. Keep longer garments on a separate rail, with extra clearance below. Use solid wall fixings and check every rail with a spirit level. Small errors become obvious when hangers line up. They also increase strain on the fittings.
Shelves should be adjustable where possible. Place everyday items between eye and waist level, then reserve higher shelves for seasonal clothing. Drawers are useful for underwear, accessories, and soft garments that should not hang. Choose smooth runners with enough weight capacity for full drawers. Add dividers if small items become mixed together. They save time.
Accessories can make the room feel properly planned. Consider hooks, pull-out baskets, a full-length mirror, and a laundry section. Install lighting near the wardrobe front, not only in the centre of the ceiling. Motion-sensitive lighting may help during early mornings. Avoid overcrowding the room. I nearly filled every wall, but the empty floor area proved more valuable than one extra shelf. Recheck the layout after living with it for a week. Your habits may disagree with the drawing.
A spare room can become a practical walk-in wardrobe with careful planning and a little restraint. Measure the walls, door swing, window position, and ceiling height before buying storage. Leave a clear walkway of at least 75 centimetres for comfortable movement. Natural light helps, but add even ceiling lighting and focused lights near mirrors.
My first layout looked attractive but worked badly. Long garments touched the floor, and folded clothes disappeared behind hanging rails. A better arrangement separates daily clothing from occasional pieces. Keep shirts, trousers, and jackets at eye level. Place shoes on low shelves, and store seasonal items in labelled boxes above. Use one open section for tomorrow’s outfit. It saves time on busy mornings.
A full-length mirror can make the room feel larger and reveal poor lighting. Choose adjustable shelves where possible, because wardrobes change with habits and clothing sizes. Soft-close drawers reduce noise, while washable floor surfaces handle dust and dropped accessories. Keep a small basket for worn clothes, but do not let it become permanent storage.
The room should support real routines, not magazine-perfect styling. Leave some empty space. Overfilling makes cleaning difficult and hides useful garments. Check the wardrobe after two weeks of use. If a shelf remains untouched, move it or remove it. That small correction often improves the entire room.
Recommended planning dimensions help organize clothing efficiently while preserving comfortable everyday movement.
Use deeper storage for folded clothing, longer hanging zones for dresses and coats, and a wider central aisle for comfortable access and dressing.
Leave about 90 centimetres between storage runs. A narrower aisle may work, but open drawers can make movement frustrating. Measure with drawers fully extended.
Use double hanging for shirts and trousers. Reserve tall hanging space for coats and dresses. Add drawers for folded clothing and shelves for bags.
Keep everyday items between waist and eye level. This reduces bending and reaching. Needs change, so adjustable components are useful.
Reserve one wall for long garments and another for daily clothing. Avoid adding too many shelves. My paper plan looked efficient, but it reduced hanging space.
Use even ceiling lighting for general brightness. Add sensor-controlled lights inside darker sections. Wall lights can reduce mirror shadows. Keep switches near the doorway.
Ask a qualified electrician to complete electrical changes. Have the work checked properly afterward. Do not rely on guesswork near wiring.
Choose flooring that handles frequent walking and rolling storage units. Repair loose boards, squeaks, and uneven areas first. Hard flooring cleans easily but may feel cold.
Fill nail holes, seal stains, and inspect corners for dampness. Do not paint over a musty patch. Find the moisture source first.
Keep ventilation clear, especially where clothing touches external walls. Moisture can damage walls and clothing. Some corners may remain imperfect. Easy use matters more.
How to convert a spare room into a wardrobe begins with assessing the room’s dimensions, condition, natural light, and your personal storage needs. Consider how many clothes, shoes, accessories, and seasonal items you have before planning the layout. Divide the space into practical zones for hanging garments, folded clothing, footwear, and everyday accessories. Choose a combination of rails, shelves, drawers, and open storage that makes the most of the available walls while keeping movement comfortable.
Before installation, repair imperfections, improve the lighting, and select durable, easy-to-clean flooring. Install storage components securely and arrange them according to how often each item is used. Keep frequently worn clothing within easy reach, while placing seasonal or occasional items in higher or less accessible areas. Finally, organize everything by category, color, or use, and refine the arrangement after living with it for a while. Thoughtful planning can turn an unused room into a practical, attractive, and efficient walk-in wardrobe.
